Quick Start
Discover how easy it is to get up and running with Alloy's Unified API in this 10 minute tutorial.
Overview
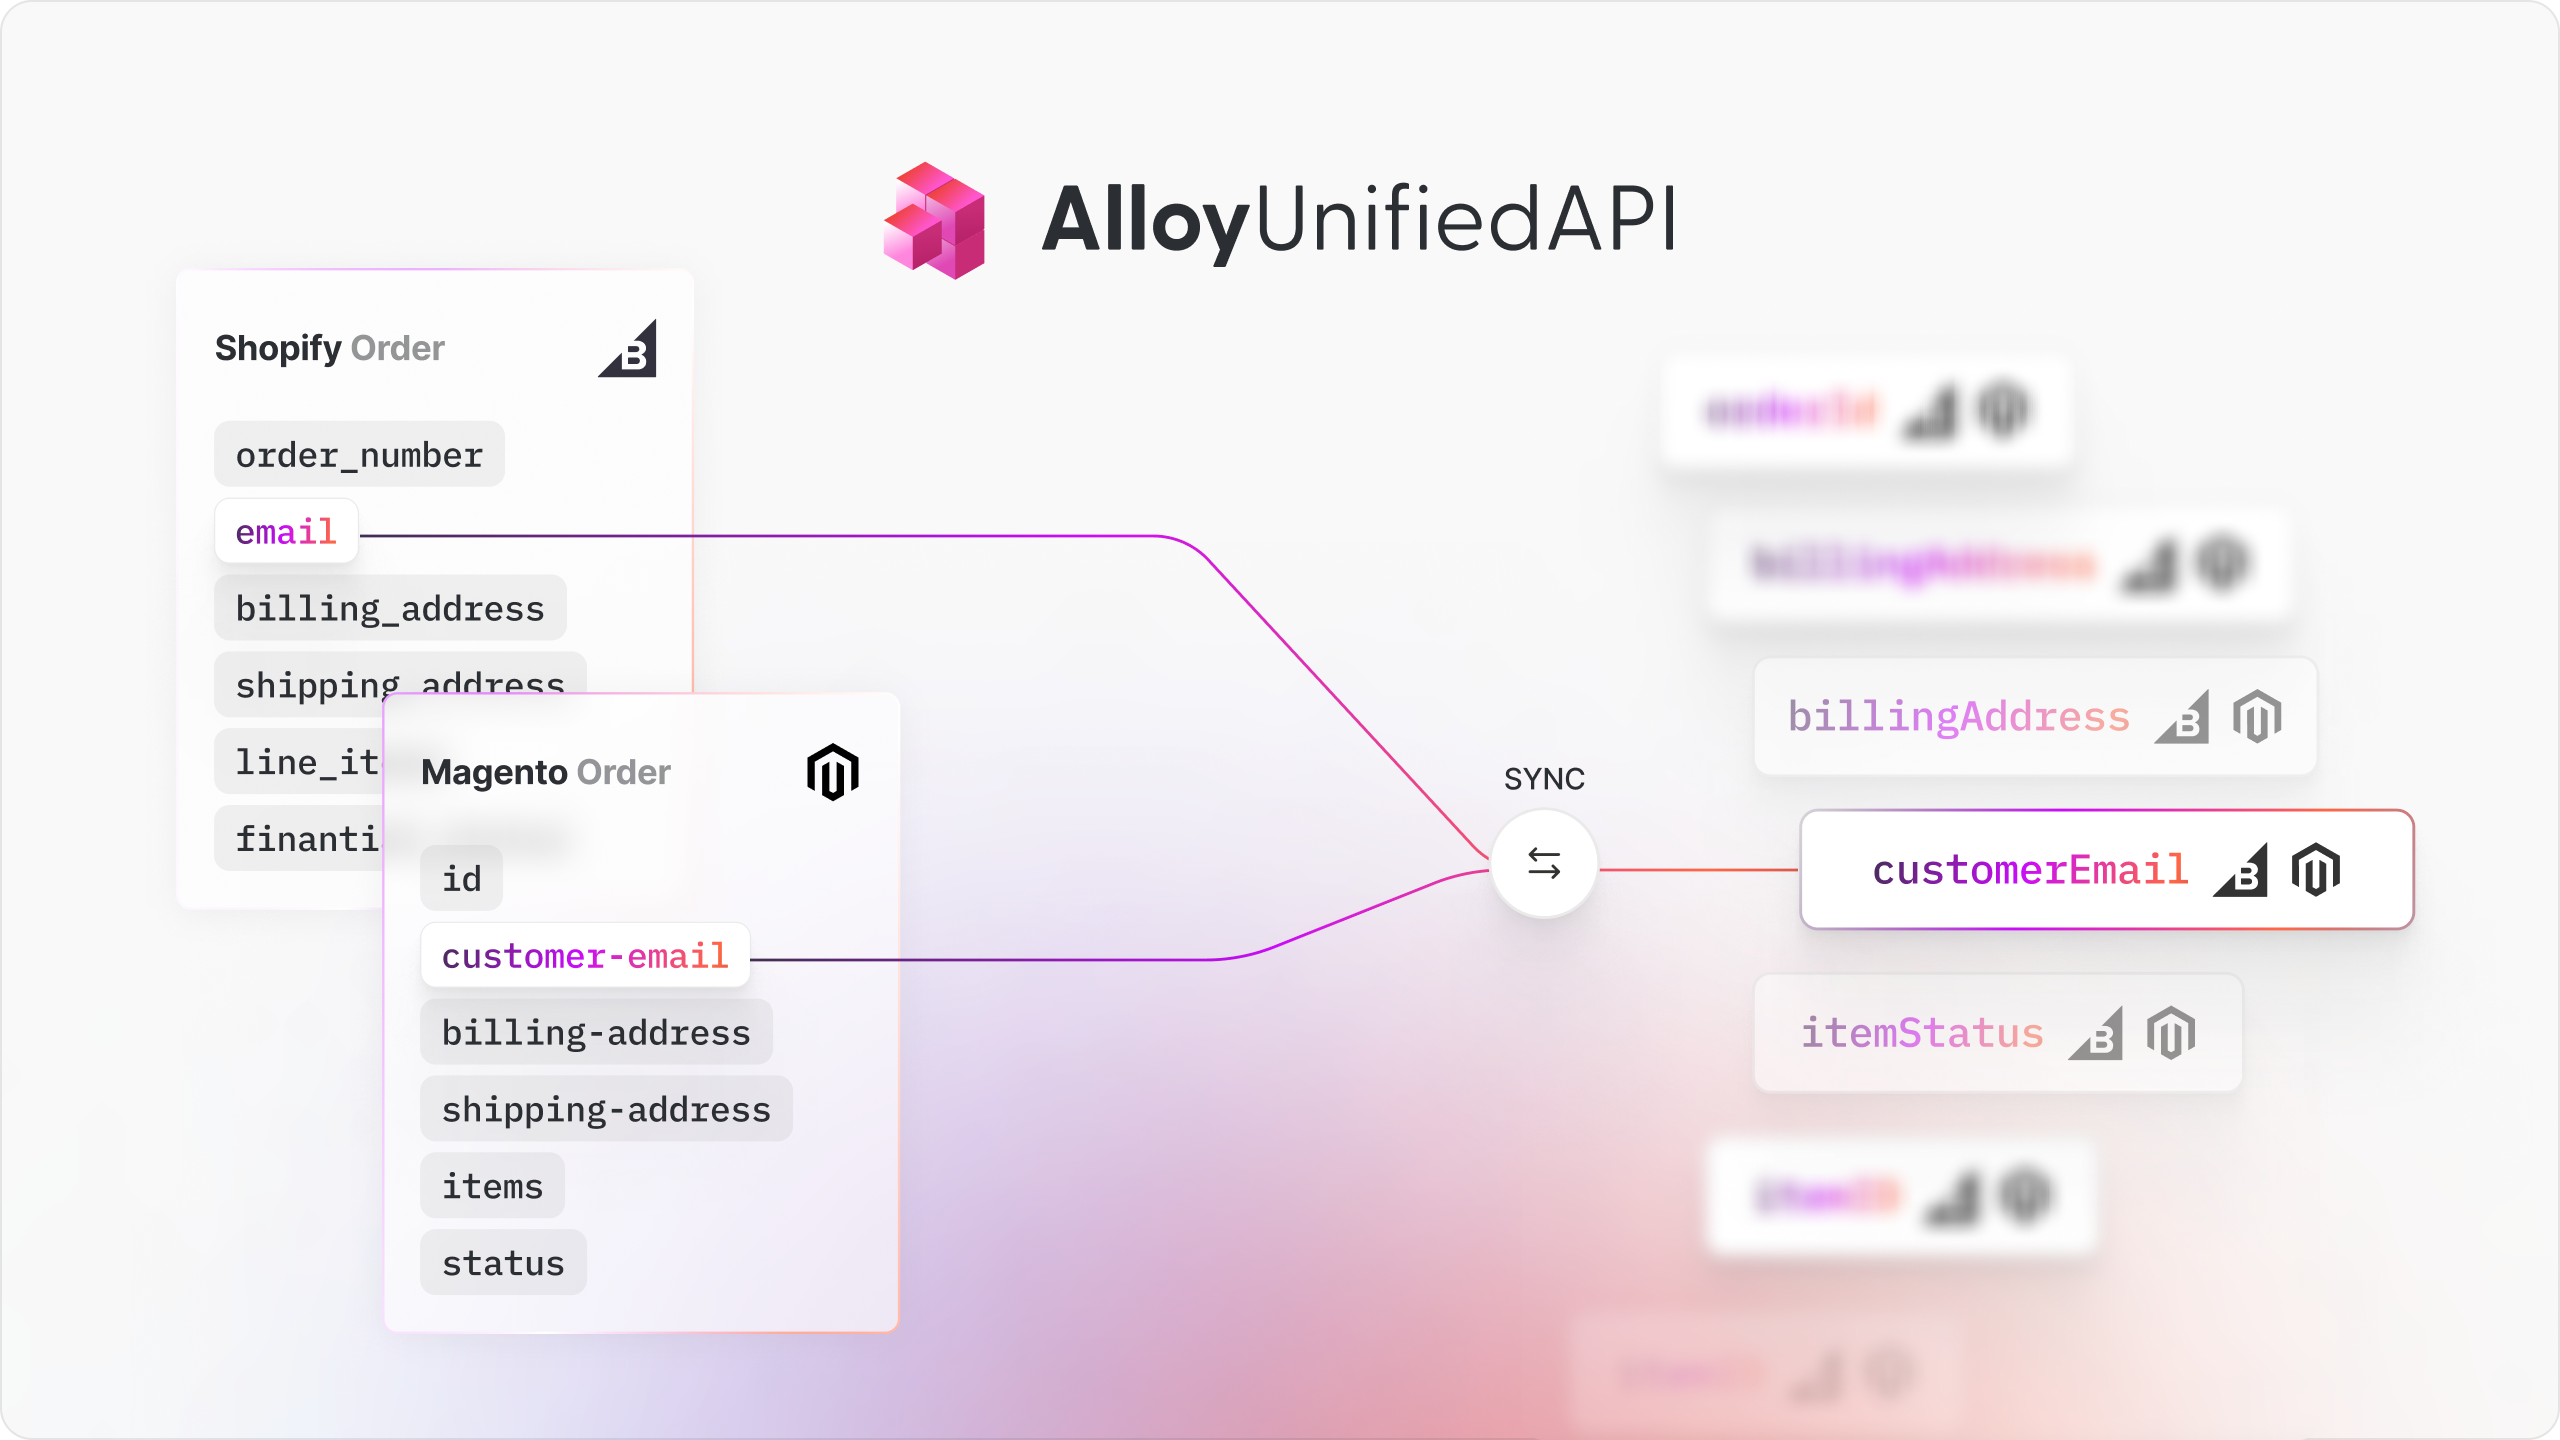
Alloy Unified API makes it quick and easy to access dozens of apps in a Unified format. If you're not yet familiar with how Unified API works, check out this article. In this tutorial, we'll dive right in and implement Unified API.
In this tutorial, we'll refer to "You" as the ISV and your clients/users as "end users". Please review the terminology section if you have any questions.
Use Case
Before we begin, let's revisit the example scenario from the previous article.
Let's assume you're in the business of underwriting loans. An individual named Joe operates an online shoe store. Joe comes to you seeking a $50,000 loan and claims to have gross sales north of $20,000 each month. Joe operates his online shoe store online, selling on Shopify and eBay storefronts.
Based on the operating margins of his business, he feels that his online sales are sufficient and he meets the requirements to be underwritten for this loan. You want to quickly verify that Joe's claims are legitimate, get an accurate picture of Joe's financial standing, and underwrite the loan. Alloy's Unified API is here to help save the day!
How it Works
With the Unified API, your engineering team can quickly build powerful, native integrations in minutes, not months. Unified API standardizes data from various Third Party Apps into common data models so you just need to implement a API and let us do the hard work. With Unified API, you never need to worry about:
- Ongoing API maintenance
- Data mappings
- Authentication (OAuth) and credential encryption
- Polling and webhook subscriptions
Getting Started
Cloning the Repo
To get started, first clone the demo app. You can clone the repo by following the steps below:
git clone https://github.com/alloy-automation/unified-api-demo.git
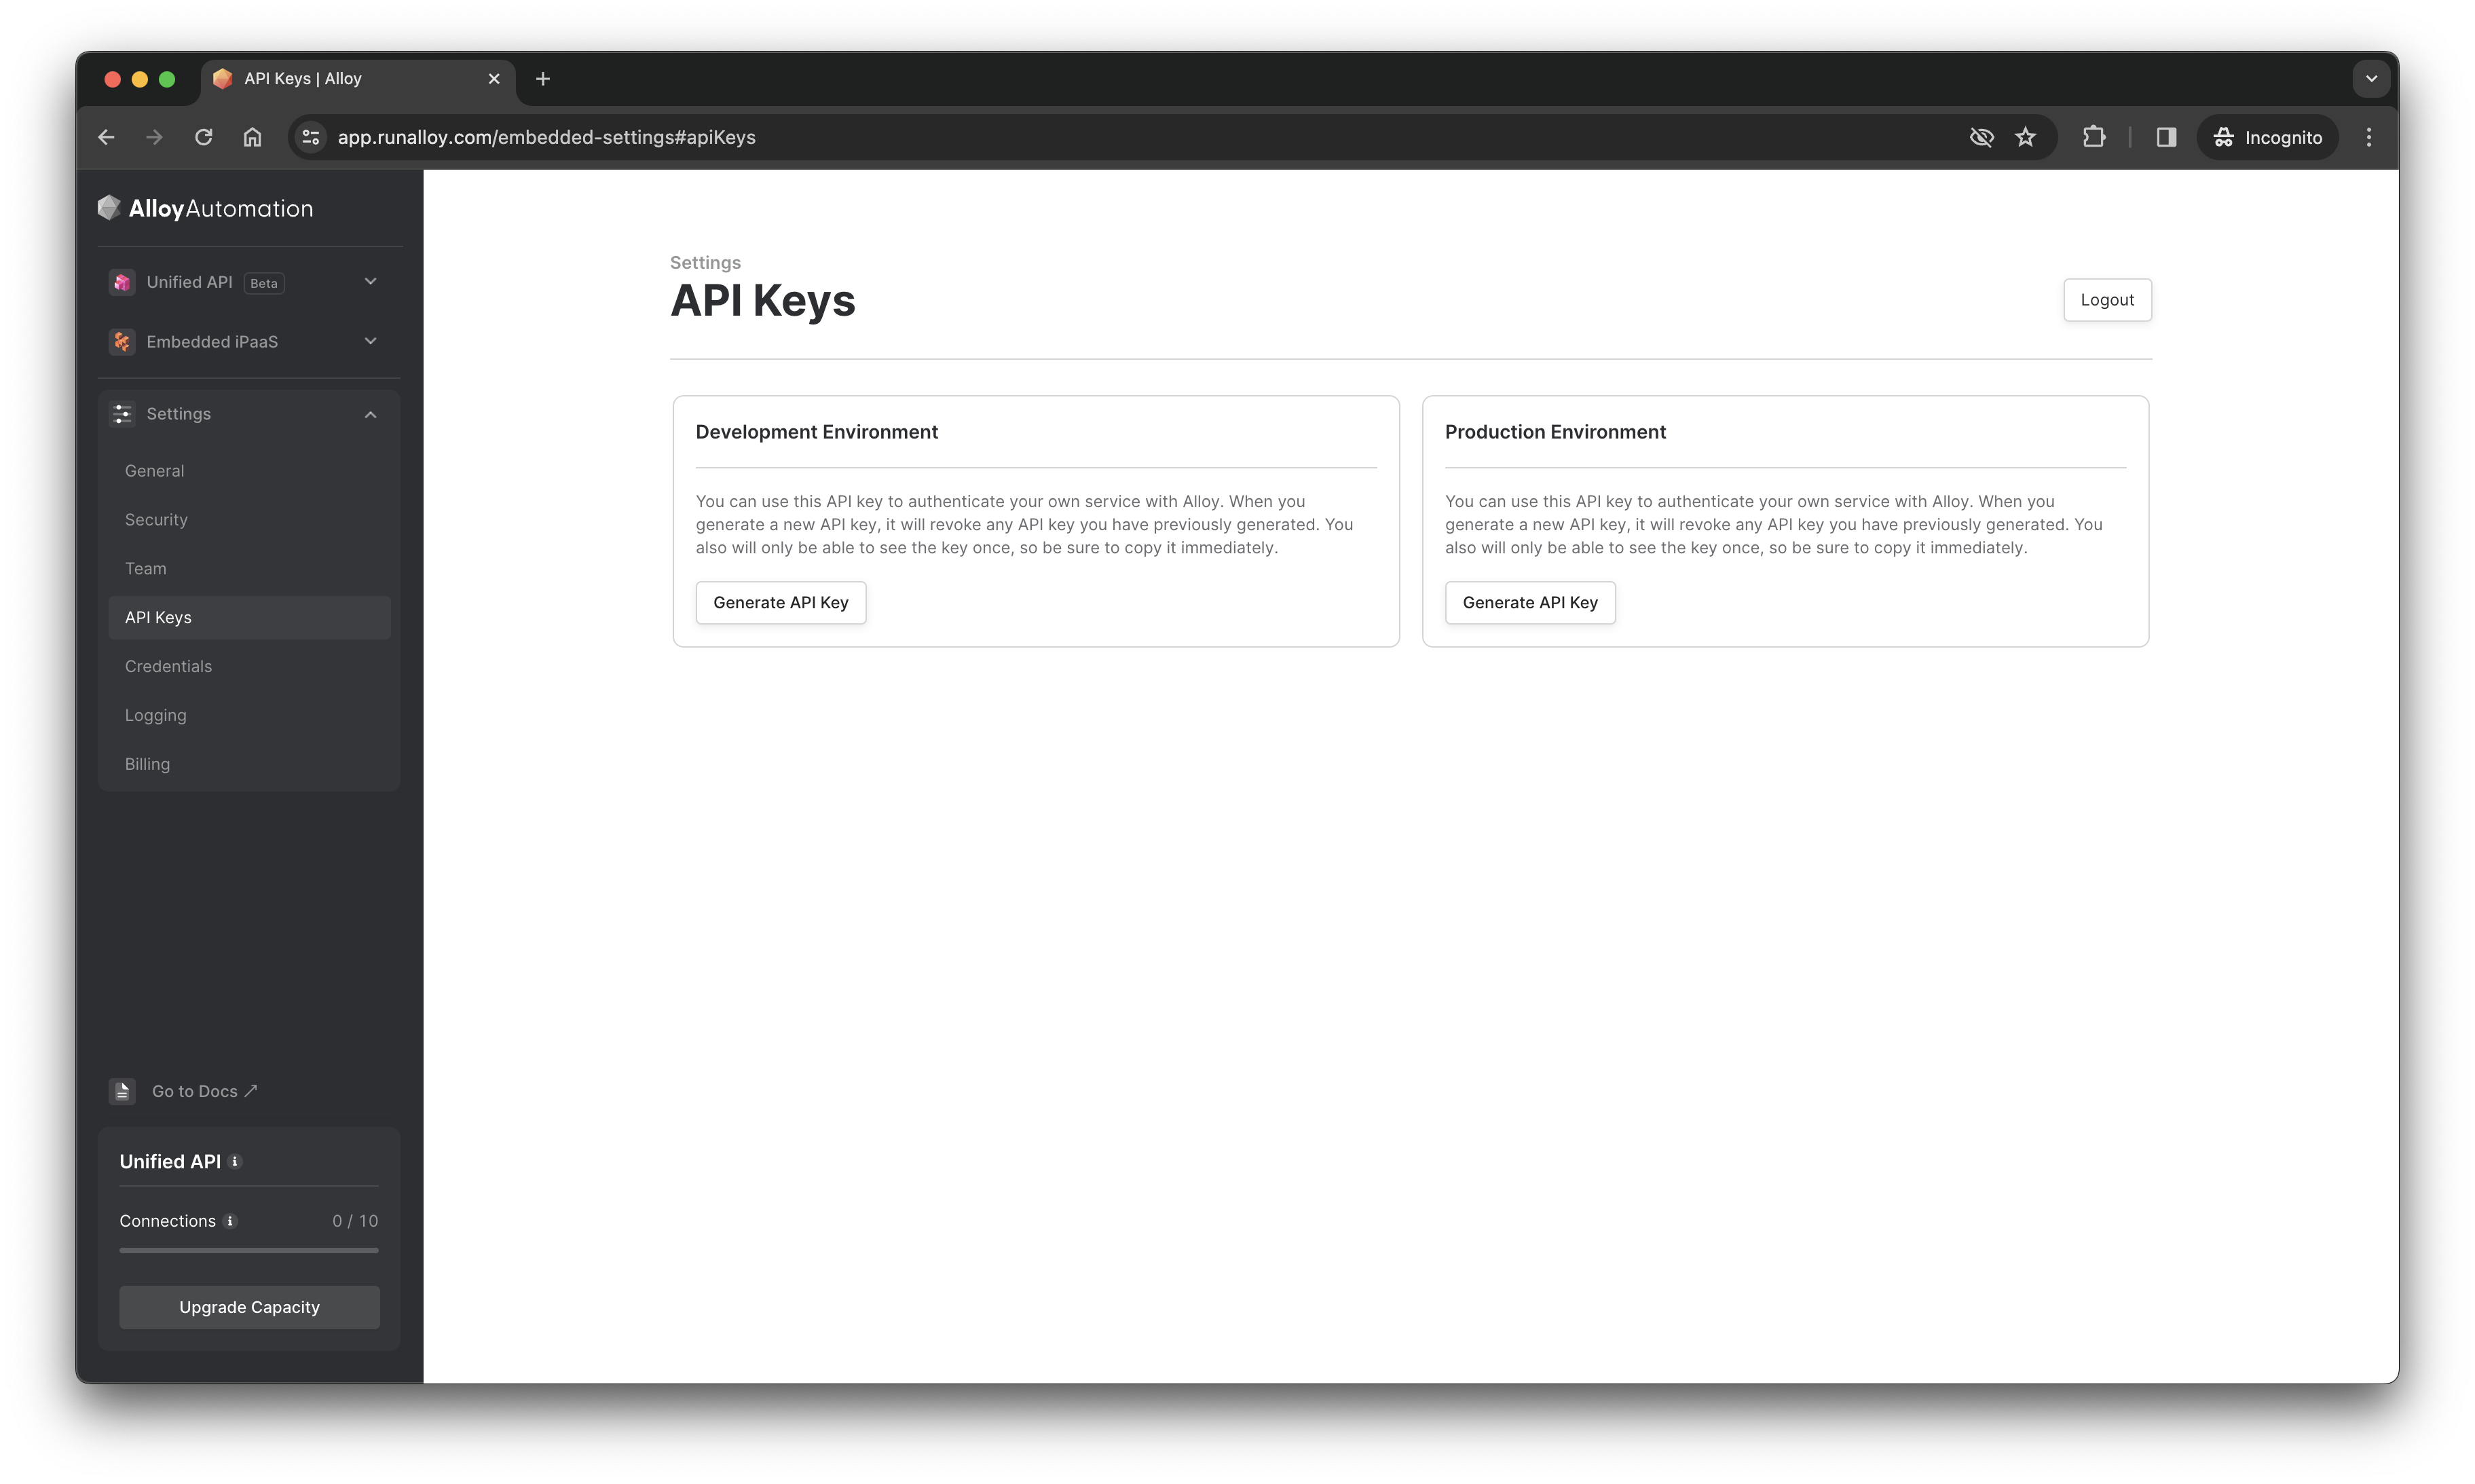
Obtain an API Key
Before you can run this project, you will need to an API key to authenticate your requests to Alloy Unified API. You can obtain one by signing up for a free account here then navigating to Settings > API Keys. Once you have your API key, in the config.js file located in the root of the directory add your API key there.
Running the Server Locally
Next, from the root of the project, navigate to the server directory and install the npm modules and start the server with the following commands:
cd server
npm install
node server.js
Running the Frontend Locally
To set up the frontend, navigate to the client directory. Install the dependencies and start the frontend app using the following commands from the root of the project:
npm install
npm start
With that, the app should be up and running on your local machine, accessible at localhost:3000.
Creating a User
If you navigate to localhost:3000, you probably noticed that you're prompted to enter a username. This username is used to call the POST Create Users endpoint. This endpoint must be called prior to creating any connections or making any API calls to fetch data from Unified API.
You must create a user in Unified API. This user represents a tenant in your application. Each username must be unique. In turn, the POST Create Users endpoint returns a userId which is a unique identifier representing the end user you've created.
To see this in action, navigate to the app.post("/user/") method on line 27 of server/server.js. This endpoint is called when you enter a username on the frontend.
You can find a curl example of this endpoint below.
 curl --request POST \
     --url https://embedded.runalloy.com/2023-12/one/users \
     --header 'Authorization: bearer YOUR_API_KEY' \
     --header 'accept: application/json' \
     --header 'content-type: application/json' \
     --data '{ "username": "YOUR_USERNAME" }'
import { UAPI } from "alloy-node";

const apiClient = new UAPI("YOUR_API_KEY");

let bodyData = {
  username: `gregg321`,
};
let data = await apiClient.User.createUser(bodyData);
from alloy_python.uapi import UAPI
uapi = UAPI('YOUR_API_KEY')

user_data = {'username': '[email protected]'}
user_data = user.create_user(user_data)
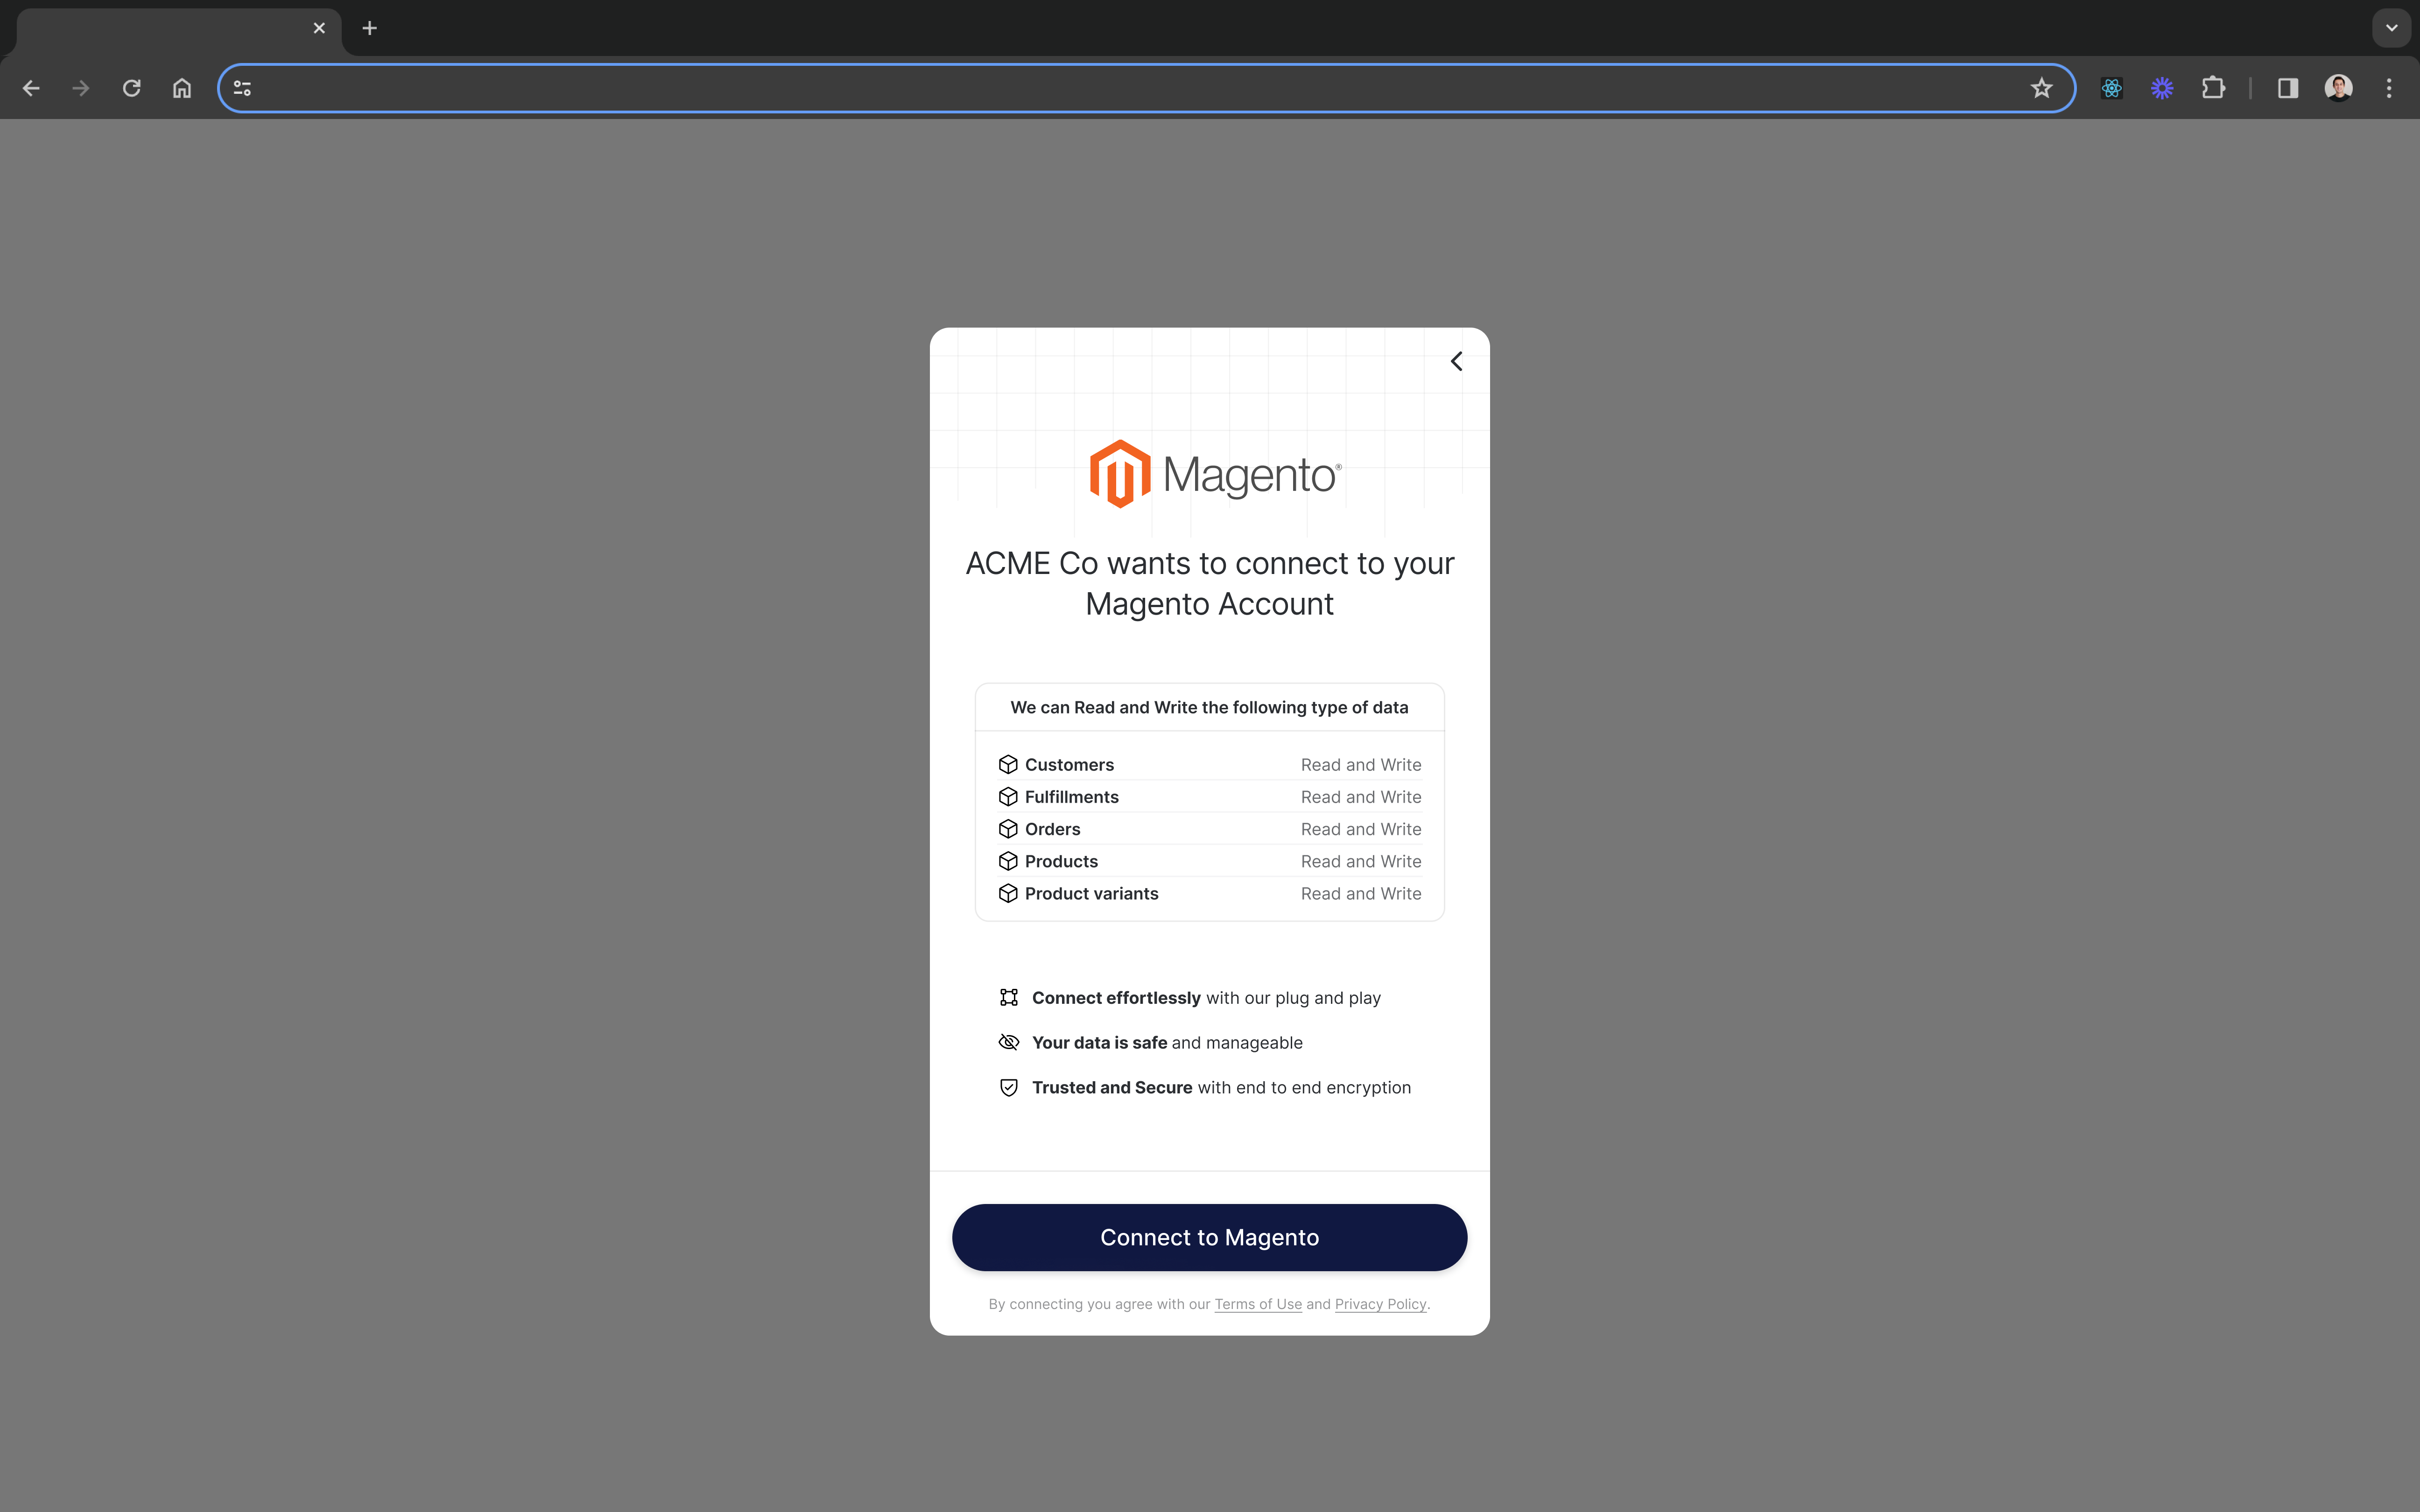
Rendering the Alloy Modal
To make it easy for your end users to authenticate, we've developed the Alloy Modal. The Alloy Modal is a frontend SDK component you'll need to add to your app when users connect via Alloy Unified API. Here's what the Alloy Modal looks like.
Installing the Frontend SDK
Our frontend SDK allows you to instantiate the Alloy Modal within your application.
To install the frontend SDK, you have two options:
- Install via npm
- Import the vanilla JS snippet into the header of your application
npm install alloy-frontend
<script src="https://cdn.runalloy.com/scripts/embedded.js" type="text/javascript"></script>
You can read more about the Frontend SDK here.
The demo site comes pre-installed with the Frontend SDK so no need to import it in the demo project.
Once you've imported the Frontend SDK, the next step is to render the modal. But before you can render the Alloy Modal in your frontend, you'll need to generate a short-lived JSON Web Token (JWT) on your server. For security reasons, you will then pass this token to your frontend.
To instantiate the Frontend SDK, use the following:
const Alloy = require('alloy-frontend');

const alloy = Alloy();
Generating Short-Lived JWT
To generate a short-lived JWT, we need to invoke the GET /user/:userId/token endpoint on your backend. You can find an example cURL request below.
curl --request GET \
     --url https://embedded.runalloy.com/2023-12/one/token/:userId \
     --header 'Accept: application/json' \
     --header 'Authorization: bearer YOUR_API_KEY'
This endpoint returns a JSON Web Token which looks something like the below. You’ll want to pass this to your frontend. Note that this token is only valid for an hour so you’ll need to regenerate it again each time you intend to render the modal. Also note that the JWT is user-specific meaning that you’ll need to generate a new token for each user.
{
	"token": "XXXXXXXX.YYYYYYYYY.ZZZZZZZZ"
}
To see this in action, locate the app.get("/token/:userId") method on line 56 of server/server.js. This endpoint is called by the frontend and returns the JWT.
Frontend SDK Methods
Switching over to the frontend, locate the handleAuth() method in App.js within the client directory. Here, we invoke the /token/:userId endpoint and after it returns the JWT, we pass the JWT as an argument to the Alloy.setToken() method on the frontend.
The setToken() method sets the JWT for this instance of the Alloy SDK and makes it available in every subsequent SDK method you call. All frontend SDK methods require that you must first invoke setToken().
Alloy.setToken("<YOUR_TOKEN>");
Once you've set the token, call the Alloy.authenticate()method to show the modal. This endpoint takes an app name (a full list can be found by calling the Get List Apps endpoint. For a complete list of arguments this method accepts, please see this article.
Alloy.authenticate({
  app: "shopify",
  callback: (data) => {
		console.log(data);
	},
})
Back in the demo site code, you'll notice we invoke the authenticate() method from within the handleAuth() method.
💡 Note: if you’re interacting with the Alloy.js SDK from a react app, you can call these methods by invoking
window.Alloy.authenticate().
Once the callback is invoked, your data for the authenticated app will start syncing. With that, you've successfully connected to Alloy Unified API. This is where our demo app ends. But before you go anywhere, let's explore how Alloy Unified API endpoints work.
Behind the scenes, Alloy's Unified API subscribes to all incoming webhooks after the user has authenticated and maintains a cache where merchant data is stored. This cache allows ISVs to bypass traditional rate limits on third party services and near instantly retrieve large sums of data. Our Unified API also has built in polling reconciliation to mitigate against dropped webhooks.
Reading Data
Now that you've created the user and successfully authenticated our Shopify store, let's make your first API call to retrieve the list of orders in Joe's store. You can use this data to verify the sales volume Joe says he has.
To list all orders associated with Joe's Shopify store, we'll call the Commerce API.
Alloy's Unified API Commerce, Accounting, and CRM models with more being rolled out each month.
To fetch e-commerce site data, we'll use the Commerce API and make a request to the GET List Orders endpoint. An example request is shown below.
curl --location 'https://embedded.runalloy.com/2023-12/one/commerce/orders?credentialId=YOUR_CREDENTIAL_ID' \
--header 'Accept: application/json' \
--header 'Authorization: Bearer YOUR_API_KEY'
Few things to note:
- The base URL is
https://embedded.runalloy.com/. - You must include an API version (i.e.
2024-03). Alloy releases regular quarterly updates to all APIs. We advise you always use the latest version which is denoted by the date closest to today. - The
/one/commerce/path which denotes the type of Unified API we are invoking. The/commerce/path indicates we're calling the Commerce API. - Lastly, notice the
/orders/path which denotes the specific endpoint on Alloy's Commerce Unified API we're about to call.
Getting a credentialId
To begin fetching resources for a user, you will need a credentialId. To retrieve a list of credentials for a user, make a request to the GET List User Credentials endpoint. An example request is shown below.
curl --request GET \
     --url https://embedded.runalloy.com/2024-03/users/USER_ID/credentials \
     --header 'Authorization: bearer YOUR_API_KEY' \
     --header 'accept: application/json'
Replace USER_ID with the user's userId created in Alloy.
Before we go any further, be sure to make sure you:
- Passed the Id of the credential you want to retrieve orders in your query parameters.
- Sent your API key in the bearer auth header.
Good work! Fire up postman and call the endpoint. You should see something like the below.
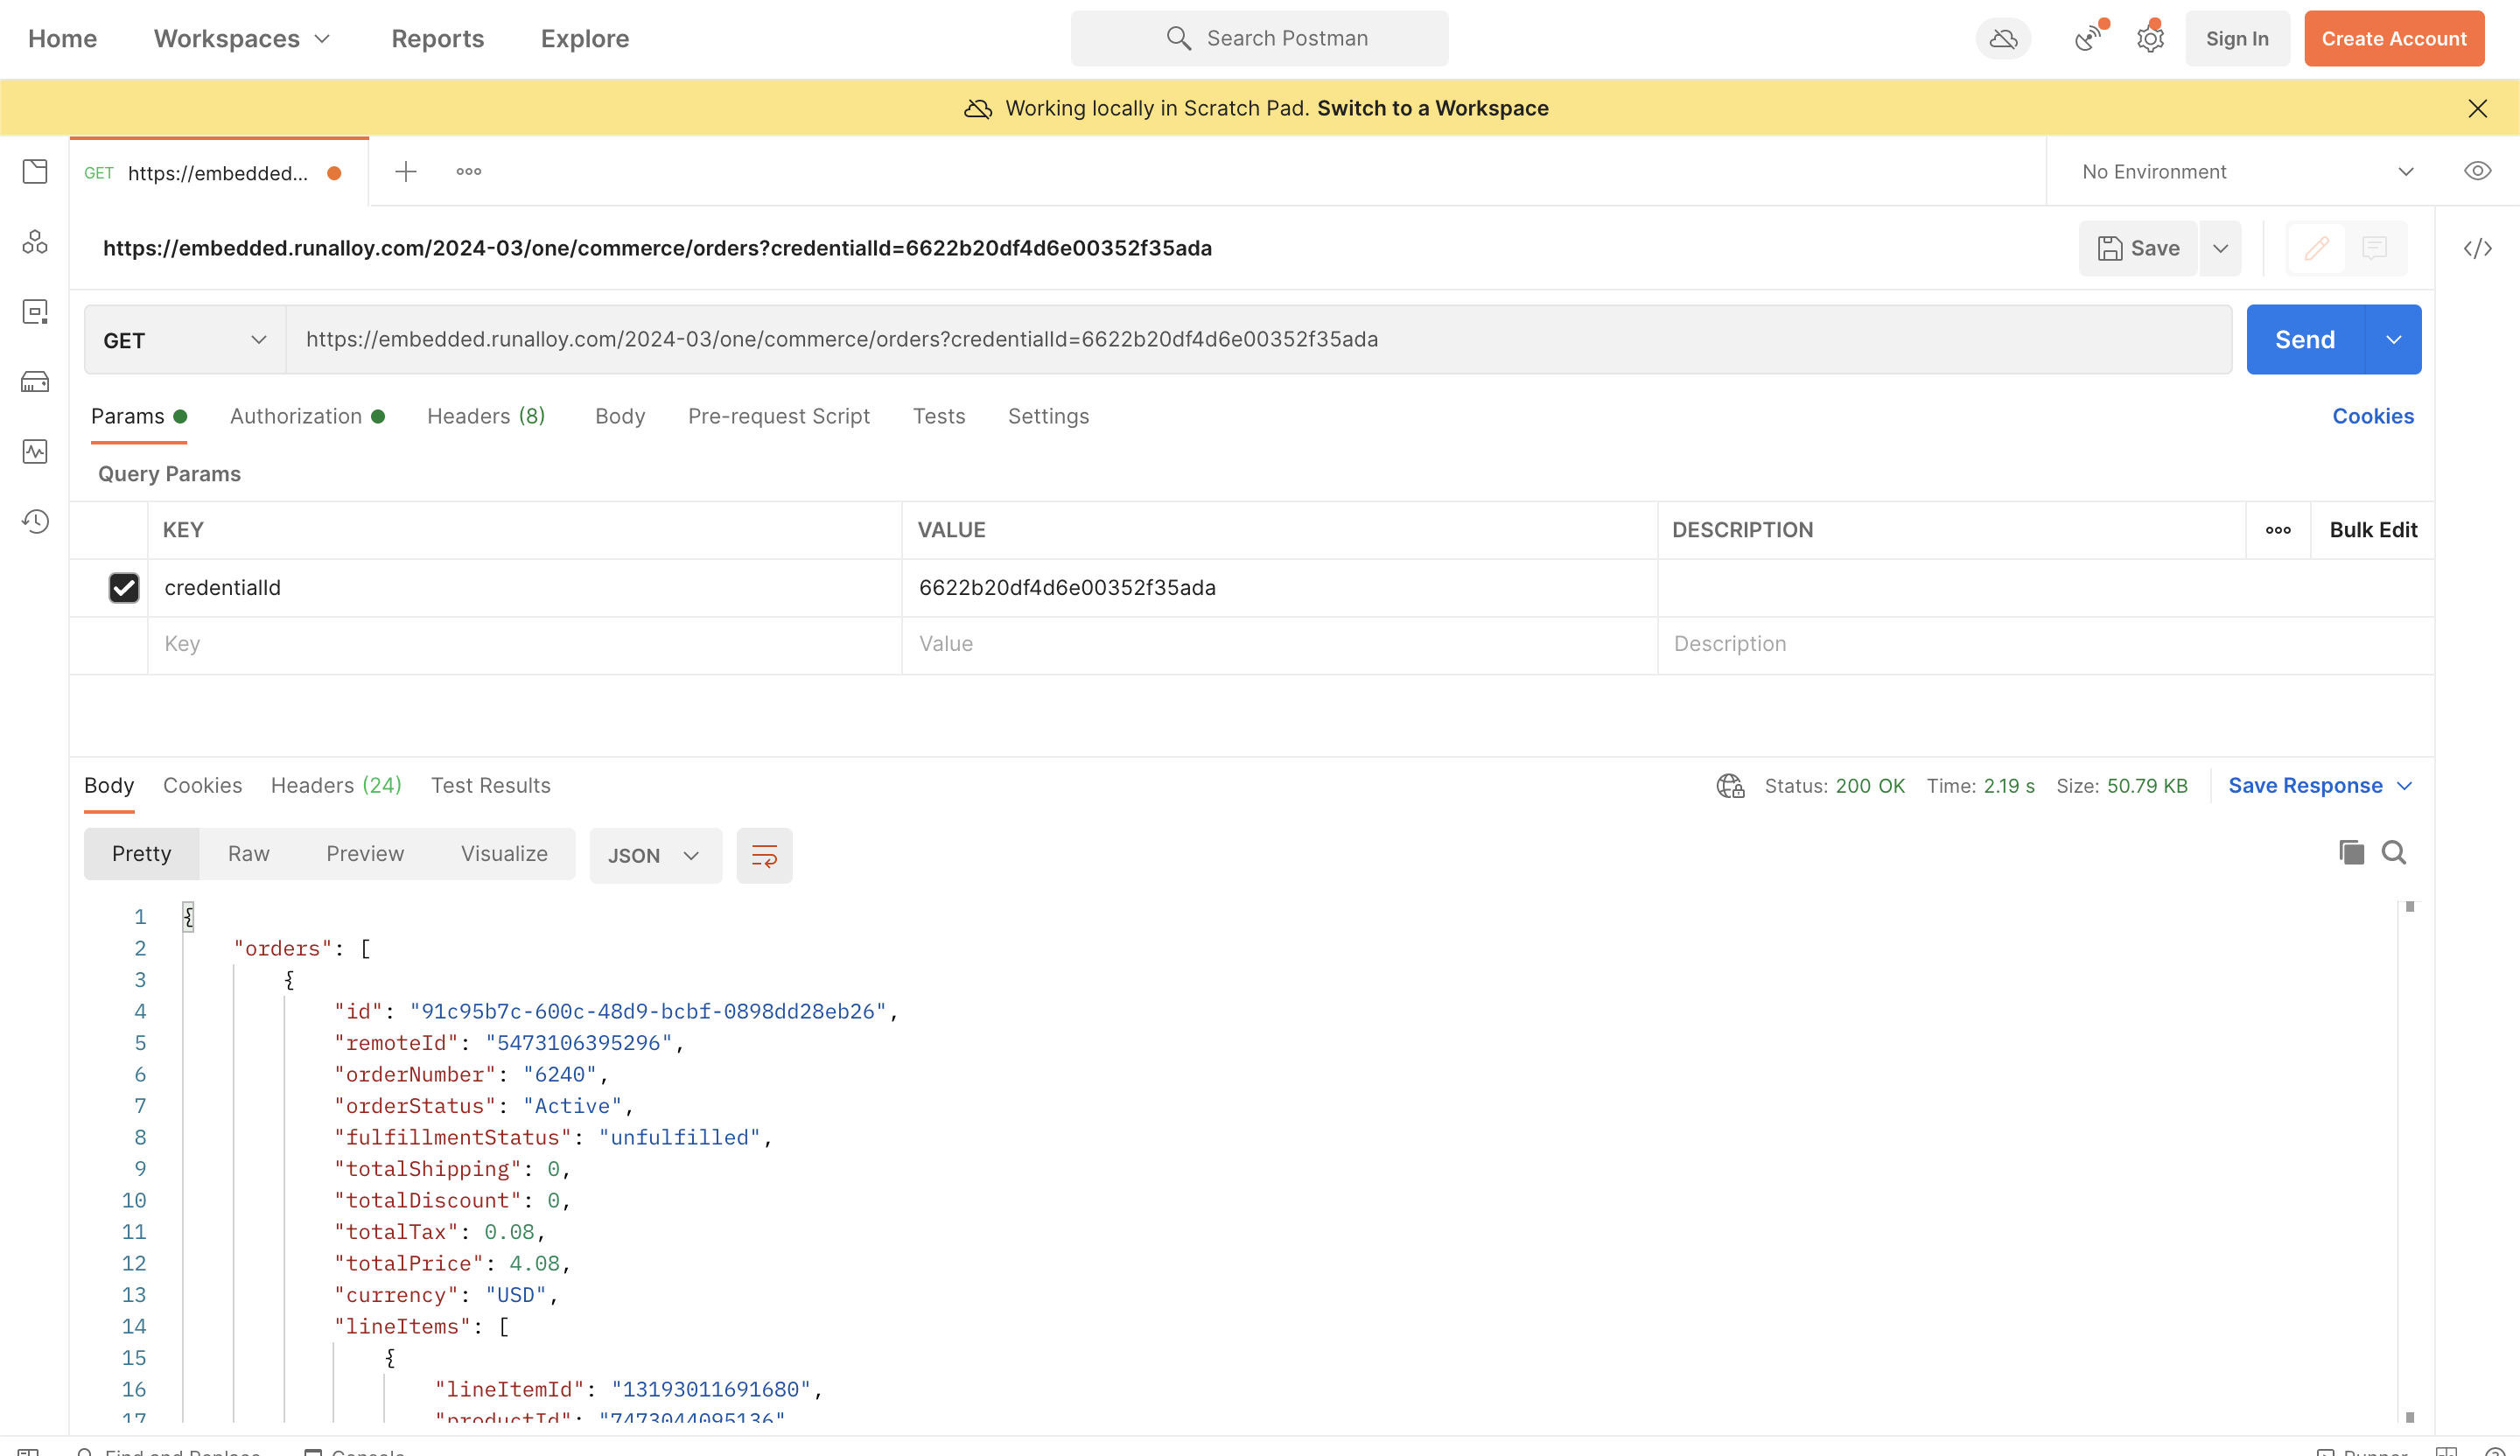
Pro Tip: you can easily access our Postman Collections here.
If you were to connect a different app, say eBay, you would still see the data formatted in the same schema whenever you call this endpoint.
Writing Data
So far, you have only been pulling (i.e. reading) data from Alloy Unified API. Assuming you need to push data on behalf of a user, you can invoke our write endpoints.
Assume you want to update the status of an order in your end user's Shopify store. To do so, invoke the PUT /orders endpoint and pass along the status in the request body. An example request can be seen below.
Example Request
curl --request PUT \
     --url '<https://embedded.runalloy.com/2023-12/one/commerce/orders/<ORDER_ID>?credentialId=YOUR_CREDENTIAL_ID' \
     --header 'Authorization: Bearer YOUR_API_KEY' \
     --header 'Content-Type: application/json' \
     --header 'accept: application/json' \
     --data '{"status": "cancelled"}'
Example Response
{
  "orders": [
    {
      "id": "a1b2c3d4-e5f6-7g8h-9i0j-1k2l3m4n5o6p",
      "remoteId": "1234567890123",
      "createdTimestamp": 1673889118,
      "updatedTimestamp": 1673889120,
      "orderNumber": "2001",
      "orderStatus": "Pending",
      "fulfillmentStatus": "unfulfilled",
      "totalShipping": "5.00",
      "totalDiscount": "1.00",
      "totalTax": "0.50",
      "totalPrice": "15.00",
      "currency": "USD",
      "lineItems": [
        {
          "lineItemId": "12345678912345",
          "title": "Custom T-Shirt",
          "price": "7.50",
          "unitCost": "5.00",
          "currency": "USD",
          "sku": "SKU12345",
          "quantity": 2,
        }
      ],
     ...
    },
}
The data will always come back in the same consistent unified schema.
Subscribing to Events
So far, we've looked at our to read and write data using the Unified API. Oftentimes, situations arise which require you to receive real time events. For example, perhaps Joe's store has inconsistent order volume and he also wants to keep a line of credit open with your company. You might want to monitor his incoming sales data to dynamically adjust the line of credit based on sales volume.
By default, Alloy Unified API subscribes to all incoming webhooks when the user first authenticates. This ensures we have a realtime cache – whenever you need to call the UAPI (i.e. such as listing all customers), you can be sure the cache is up to date.
To create an incoming webhook, you'll need to review the invoke the POST Create Subscription endpoint and pass along the credentialId, address, and scope.
By making the request seen below, you're specifying where Alloy Unified API should send all incoming events.
curl --request POST \
     --url 'https://embedded.runalloy.com/2023-12/one/webhooks?credentialId=YOUR_CREDENTIAL_ID' \
     --header 'Authorization: Bearer YOUR_API_KEY' \
     --header 'accept: application/json' \
     --header 'content-type: application/json' \
     --data '{
         "address": "<YOUR_WEBHOOK_URL>",
         "scope": "commerce/customers"
     }'
Behind the scenes, we'll route any events directly to this URL you've specified. Some apps, like Magento, don't support webhooks natively. When this occurs, Alloy Unified API uses polling to periodically check for new records triggers the webhook accordingly. As you'd expect, we'll send you the unified model that corresponds to the scope you selected.
You can delete a webhook subscription at any point by invoking the DELETE /webhooks/{subscriptionId} endpoint.
For more information on Webhook Forwarding and the list of available topics, please see this article.
Wrapping Up
It's easy and fast to get started with Alloy's Unified API.
Unified API makes reading and writing data simple and maps data from multiple sources to a single, consistent schema. Behind the scenes, Alloy's Unified API subscribes to all incoming events the minute an end user authenticates and maintains a cache where user data is stored. This cache allows ISVs to bypass traditional rate limits on third party services. Alloy Unified API also has built in polling reconciliation to mitigate against dropped webhooks.
Oftentimes, reading and writing data isn't the only use case. If you need to subscribe to realtime events, you can use Webhook Forwarding.
We can't wait to see what you build next!
Updated 3 months ago